Step 1
Open a new file with the size 100x100, then put your image on there and crop
the picture however you like.
Step 2
Desaturate the image via Image >> Adjustments >> Desaturate
Step 3
Create a new layer on top of your desaturated image and fill it with a dark
blue color (#003F75).

Then set the layer to Screen

Looks okay already as well, and you can add text/brushes/borders to it but I like to put some more touches to it.
Step 4
So here we have to do some finetuning again with the image below. A simple trick
for this is to duplicate the desaturated layer of your image
and then set the layer on soft light. You can play with different
layer modes for it to find what you like best.

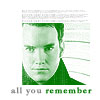
Step 5
And now you can add brushes/text/borders etc. to put the finishing touches on
your icon.

The tutorial works also with dark green (#007500) and dark red (#770202). The image used for the tutorial is from Torchwood.de